| Controlling which files to
upload to the web |
|
A key task during web upload sessions is to control
which files are to be uploaded by the ftp system each time you create
or update any results. |
The
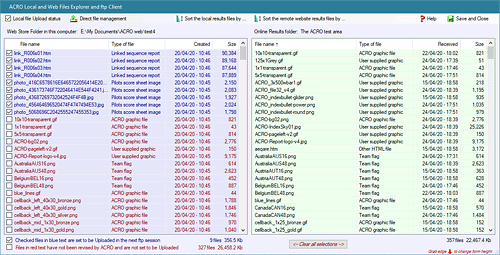
ACRO Local and Web Files Explorer
This
comprehensive form enables you to
check and review all of the files in your computer and in your target
website folder to ensure that upload sessions employ only
those results files that are new or have been revised since the last
session, avoiding unnecessary work. |
 |
|
Files in your local folder are shown in the
LEFT table with a light blue background
You
can change the sort-order of the files in
both tables by clicking the column-header or by using the relevant sort
menu items. In the local files table the checked items can helpfully be shown
above un-checked items to clarify what is next to be uploaded.
You
can check or un-check the files in the
local table to reset their
status -
●
●
● |
Files to be Uploaded in the next session are
shown checked and are
displayed in
blue.
Their checked status will be cleared
after they have been uploaded.
Files
that have been successfully uploaded and do not need to be
included in the next session are shown in
red with their check-boxes cleared.
The menus provide many options to revise the status of selected blocks of local files. |
|
|
Files
in the website folder are shown in the
RIGHT table with a pale green background |
|
The Direct file
Management menu provides many ways to
set the
File Upload Manager to -
● Upload checked or
selected local files to your website
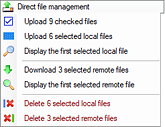 ●
Display individual local or remote files (in your browser) ●
Display individual local or remote files (in your browser)
●
Delete individual local or remote results files
These features allow you to do much
of your results file handling from within this Explorer environment, in
a similar manner to the capabilities offered by most FTP clients.
When you click to upload some files
the ACRO Upload Manager will be displayed and the process continues in
the usual way, returning to this Explorer interface when the session is
complete. |
|
You can also Right-Click to Upload, Display
or Delete individual files
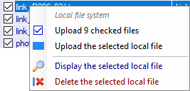 Select
the "Show" option to open and display a local Select
the "Show" option to open and display a local
file in the appropriate /
default application.
You can also delete a file from the local or remote folders
by selecting "Delete this file". Note that this step can not be undone so be sure to delete only files that you
know can be replaced or are unused. |
|
|