|
|
|||||||||
| Creating a Web Index Page to link your web results together | |||||||||
 Here you can create a simple web Index Page that will provide a gateway
to all web report pages in your contest web folder. Here you can create a simple web Index Page that will provide a gateway
to all web report pages in your contest web folder.You can include other ACRO pages such as Flying Orders, Pilot lists etc., and also link directly to pages elsewhere on the internet. Use the browser preview button on the form to display how the links to web files in different folders works in your local computer. |
|||||||||
| Using the ACRO web Index Page system | |||||||||
 |
|||||||||
|
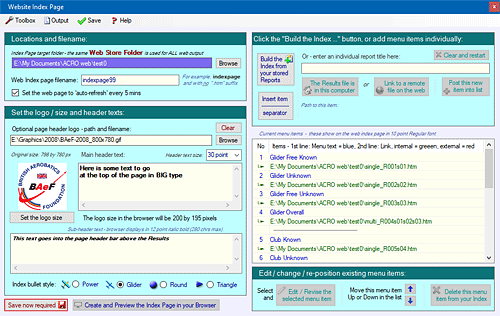
The Index Page Target
Folder (aka the Web Store Folder) Use the Browse buttons to locate and set the target folder for your Index Page and the logo you wish to display on it, and set the Index Page filename in the textbox. Including your event logo Browse to specify the logo you want to use - a thumbnail of the selected logo is shown here and the size it will appear in the browser is given. Use the button below the thumbnail to resize it to between 5% and 200% of its original dimensions for your web index page - this creates a temporary graphic file with the logo at the right size for inclusion on your page. Use a PNG graphic for your logo if possible, not a JPG or a GIF - with the latter graphic file types, if there is a white or coloured background around the logo these blocks of solid colour will remain unchanged and the logo will look a bit like a poster stuck on the page. Header texts Enter your main heading text in the textbox next to the displayed logo, and sub-header text in the wider textbox below. If you don't set a logo the main header will be the full width of the web page (750 pixels), or if you clear the logo and the main header text the page will display only the sub-header. The main header is displayed in the browser in 18pt bold text and limited to 300 characters, and the sub-header in 12pt Italic text and limited to 1200 characters. Adding Menu items and their links There are two ways to add index items into your page - |
|||||||||
| 1. | To add an
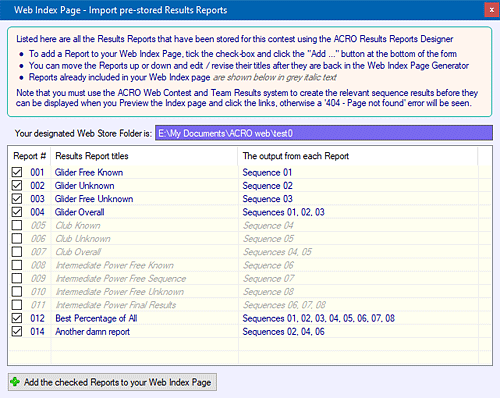
ACRO Results Report for Single or Multiple Sequences Click the "Insert pre-stored Results Reports..." button to see a complete list of the Results Reports that have already been established for this contest using the ACRO Reports Designer. You can now select any of these items and click "Add the checked Reports ..." and both the title and the results file link will be imported back into the Index Page. To edit the title you can now select an item and revise it as required. |
||||||||
 |
|||||||||
| Note that if you have not already created the necessary results files using the "Contest and Team Results" form then Preview will result in a '404 - page not found' error. | |||||||||
| Alternatively you can enter a suitable title in the top text-box, then click "The Results file is in this computer" to find and select the item you want. Your title and the required link will be transferred directly into the list of index items below. Or ... as a last resort you can paste or type the link text into the textbox, but you'd better get this exactly right! | |||||||||
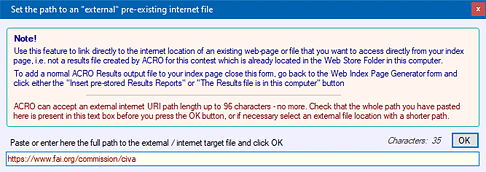
| 2. | To add a link
to an external web page or file that is already available
on the internet, enter a suitable title in the top text-box and click
"Link to a remote file on the web" to see a form into which you can
paste or hand-enter the web URI for the link. The result is immediately
transferred into the list of index items below. To subsequently edit the
title, or the html link URI, use the Edit button at the bottom of the
form. This feature is offered only so that you can add index links to other remotely located material - for ACRO results in this contest however always use the above method. |
||||||||
 |
|||||||||
|
|
|||||||||
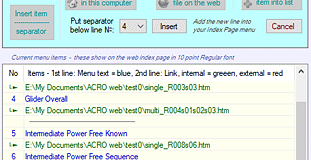 Add
menu separator lines Add
menu separator linesTo insert a grey horizontal line between groups of menu items in order to separate them into sections like a Windows menu often displays as shown here, click the "Insert item separator" button, set the item line drop-list to the line number below which you want the separator to be placed and click to Insert it. |
|||||||||
|
Repositioning items You can select any item and use the Up/Down buttons to re-arrange the menu titles and separators in the order you prefer, or use the Delete button to remove it from the list. |
|||||||||
|
Add a 'web-page-back' button |
|||||||||
| Setting the
5 minute
"Auto-Refresh" To set the index page to automatically refresh itself every 5 minutes, tick the "Set the page to auto-refresh" check-box and the index page will have some code added to make this happen, ensuring that it is always up-to-date without any refresh needed from the user. |
|||||||||
|
Minimising
the range of index-linked items It is good practice to use 'Overall Results Reports' as much as possible, clicking the score column headers in these consolidated reports will provide direct access to all of the individual sub-reports - it is unnecessary to separately add all the sub-reports to your index. |
|||||||||
 Saving your Index Page file When you Save the index page the file created is generated with "flat" links to the logo and all your linked menu items. In other words, it expects to have direct access to all of referenced items in a single target folder on the web server. This is fundamental requirement for the system to work - sub-folders cannot be used. The system will include a copy of your logo with the index file in the target folder on your computer, which must be one of the folders that you designate for upload when using the ACRO Web Upload Manager. Previewing the Index Page Clicking the Preview button generates a temporary version of the page with the logo and menu item links set to their existing locations in your computer, so that the page displays correctly. You do not have to Save the page prior to this - the preview is constructed from the current data displayed on the screen. |
|||||||||
|
|||||||||